Getting Started
Identifying tracks to the species level is much easier if you first look for certain clues. Those clues are not usually found in the track. Only one in 100 tracks show clear detail (like toe or nail marks). By far, the two most useful clues to look for are (a) the track pattern of the animal and (b) the overall trail width that the pattern makes. The track pattern diagram shown here highlights both. With just these two clues and a little practice, you will be able to tell the difference between similar species, such as the mouse and the vole.
Track Patterns
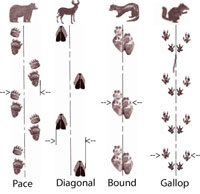
As many animals have four legs and an ability to change their speed, it is somewhat complicated to identify their track patterns. However, in an effort to not waste energy, there are distinct patterns that the various species use most of the time. Hence, it is useful to group the animals by their ‘regular’ walking pattern. There are four basic patterns (as depicted in the above diagram) a tracker should memorize. The vast majority of tracks you come across will fit into one of these patterns: 1) Pace, 2) Diagonal, 3) Bound and 4) Gallop. Let us consider each pattern, along with examples of the animals that use each. An advanced study would further consider the patterns found as the animals speed or slow their pace.
Pace pattern
The animals that use this style of walking include the wide-bodied, slow-moving types such as the beaver, muskrat, skunk, porcupine, bear and racoon. These animals seem to waddle along with their wide bodies shifting from side to side. Basically, the legs on one side of the animal tend to move together, followed by the slumbering of the two legs on the other side. I strongly suggest you get down on all fours and try this type of walk for yourself — it will make more sense! To look at it, this pattern is somewhat of a scattering of tracks — almost defying any pattern at all. Most of the animals in this category have large, soft, padded feet that are somewhat unique in themselves. These soft padded feet allow them to walk through the woods quietly.
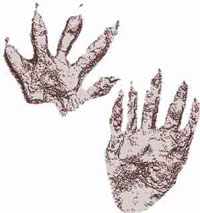
- TIP: The rear feet of many of the animals in this category look similar to human feet: elongated with a long and narrow heel.
Diagonal pattern
This next group of animals include the deer, cat and dog families, for example, deer, moose, caribou, elk, fox, wolf, coyote, bobcat, mountain lion and dog. To see the diagonal pattern, you must stand back and see the imaginary centre line with foot tracks diagonally crossing over it to form the pattern. Try diagonal walking yourself by once more getting down on all fours, stepping with your right arm and left leg together and your left arm and right leg together. For the animals that use this pattern, the rear right foot lands on top of, but slightly behind, where the front right foot was a moment earlier. Take a closer look at the track patterns diagram again.
- TIP 1: The front feet of the diagonal walkers are considerably larger than their rear feet. Now you can see, and show to others, the front and rear right and left feet of the deer tracks in your backyard. Won’t you be the envy of your friends!?
- TIP 2: For advanced study, the front feet of the diagonal walkers land further apart (side to side) than the rear feet in males and vice versa with females. A female track is shown in the patterns diagram. Immature and old animals tend to break this rule but have a wider stance compared to the length of their stride.
- TIP 3: All cats and foxes use the diagonal pattern, but the rear foot lands directly on top of the front track. Also, the cats walk with their claws retracted, so the claws do not show in the track.
- TIP 4: If you are able to see the shape of the track, remember that deer and moose have heart-shaped tracks; the dog family has egg-shaped tracks; and the fox and cat families have round tracks.
Deer have keen senses, and they usually know you are coming long before you see them. One mid-summer day, on a stroll along an old bush trail I came to a clearing. I had the sudden feeling that something was close or watching me. I assumed that someone had let my dog out of the house and it was now catching up to me. She hates to miss a good walk. I looked behind me, but nothing was there. I kept still for a moment, then continued on into the clearing. At the far end of the clearing I heard the distinct sound of a deer leaping, accompanied by the warning snorts they let off when there is danger. I looked back to the other end of the clearing where I had felt that something was watching me. That deer would have been able to see me from where it was, but just barely. Deer are very curious creatures and will sometimes circle around to see what is disturbing their area. It is possible to cut them off and get another glimpse in these situations, which is what I did. I turned right, headed into the bush for 100 metres and sat down quietly. Sure enough, the deer came back, but just a little out of sight. I could hear it move past. The reason I turned to the right was because of the likelihood that the deer was right dominant (just like some 90 per cent of humans) and would behave accordingly.
Bound pattern
The bounders include the weasel family: the least weasel, ermine or short-tail weasel, long-tail weasel, fisher, mink and marten. These animals have long bodies and short legs. Look for five toes. When you see one moving along, they tend to look a bit like a sewing machine needle as their body hunches together and then elongates in quick successions. As they move, the front two feet land first, followed by the rear two feet that land just behind the front. Some overlapping of the tracks may take place. Notice the unique and offset pattern all four feet make together!
- TIP 1: Look at the imaginary centre line of the track pattern. Notice that the sets of tracks stay true to the centre line and are not diagonal across it. Believe it or not, the old snow-covered tracks of a small weasel weighing well under half a pound (0.226 kg) can be confused with the tracks of a 150-pound (68 kg) deer. This is because the four feet of the weasel that land together are about the same size as one deer hoof, and the distance between the tracks of the two species can be similar. Moreover, in cold weather and on certain types of terrain deer tracks do not sink much, and in softer snow conditions, the weasel’s can sink a fair amount. When looking at older tracks, you do not know what the conditions were like at the time the track was made. The trick is to look for the pattern—diagonal or bound. It will be a humbling experience to confuse the two species – just don’t tell your friends when it happens!
- TIP 2: The fisher often switches between two or three patterns. When it is bounding, check the trail width. You can be pretty sure that it is a fisher.
I find weasels exciting creatures to track. They range in size from the least weasel that can chase mice through their own holes, to the fisher that is renowned for having porcupine as a regular part of its diet. On one occasion, I was following a long-tailed weasel track through some freshly fallen snow. The weasel was doing its typical routine of dodging around trees sniffing out the scent of rodents. As the trail entered a marshy area, the tracks exploded in the snow as it accelerated abruptly, heading somewhere with urgent speed. The tracks, which usually fall only several centimetres apart, were now falling many metres apart from each other – quite an accomplishment for a skinny little weasel not much bigger than a chipmunk. I knew something was up. My questions were soon answered when I saw some blue and grey feathers gently blowing around in the wind.
Upon further investigation, it seemed the long-tailed weasel had spotted the blue jay on the ground (likely feeding on seeds). The few jay tracks I found were the bird’s last. The weasel sprinted for approximately 13.7 metres before capturing the jay. The kill was likely quick as there was little evidence of a struggle. There was a stomped down area of snow about 20 centimetres in diameter. Inside this area were the majority of feathers, a few bloodstains and the skinny black legs of a blue jay. The tracks of the weasel exiting the area were closer together, as the animal was likely full and perhaps even carrying remnants of the jay to cache. Just up the hill from this area I came across another tracker’s treasure! In the hollow of a tree I found a large nest-like pile of snowshoe hare fur. Later research led me to understand the that long-tailed weasel will sometimes kill the snowshoe hare as part of its diet and make a den with its fur.
The otter is another fun animal to follow, if you get the chance. You can almost sense a joy of living as the tracks show them sliding on their belly (both on level ground and downhill), diving into ponds and swimming under the ice along rivers, then slogging through the deep snow to enter yet another water system. If you are fortunate, you will also come across mink tracks in similar areas. Minks feed on crayfish and other aquatic life. Watch for little caverns or under rocks, where they will sometimes rest and eat their catch – leaving little piles of the remains.
Gallop pattern
This is an interesting group that includes small critters like mice, voles, and shrews, chipmunks, squirrels, and larger animals like rabbits and hares. This group seems to speed along the forest floor. Their track pattern shows the front feet landing closely together and the rear feet coming around the outside and past where the front feet landed. Try this yourself and notice how much faster it is compared to the other patterns. Somewhat unique to this group is the large size of the rear feet compared to the front feet. Just visualize the snowshoe hare’s large rear feet. Don’t forget to look at the overall pattern and the imaginary centre line. The patterns flow in a straight line like the bounders. However, the big difference is in the shape of the four feet together. There are so many interesting tips with this group that make identifying each track a treat.

- TIP 1: If the front two feet land almost exactly side by side, you are looking at a mouse, not a vole of similar size. The mouse also shows long tail drag marks. See the patterns diagram: the track at the top shows a tail drag. Also, the squirrel’s front feet tend to land beside each other – useful for climbing trees.
- TIP 2: The voles tend to alternate their gait between a gallop and a pace-like pattern.
- TIP 3: The shrews, mice and voles tend to go from hole to hole for safety and to access food caches. The size of hole that each animal goes into are as follows: less than 2.5 centimetres in diameter for the shrew; 3.2 centimetres diameter hole for mice and voles; and at least a 5 centimetres hole for the red squirrels and chipmunks. These size differences do not seem like much on paper, but they are a huge difference when you see them in nature.
Interestingly, the shrew has a poisonous bite. I have seen video clips of a shrew attacking a mouse. It was a short fight, as the shrew quickly nipped the leg of the mouse and backed away. The mouse soon lost control of its body. About the same size as a hummingbird, the shrew is a treat to track. Its tracks can be so faint in the snow that unless you have proper light conditions, you may not even see the tracks when they are pointed out to you. They have a gallop walking pattern just like the mice, voles, chipmunks and rabbits.
Wherever you see these small rodent tracks, weasel tracks are often nearby. On occasion you will see evidence of the weasels catching a small rodent, such as a drop of blood near a hole. Often the kills happen under the snow.
Trail Widths
After examining the trail pattern, we should now measure the trail width. This will narrow the animal to the species level (that is, the shrew from the mouse, the chipmunk from the red and black squirrels and the fox from the coyote). Trail widths are measured in various ways based on the walking pattern used. Again, see the track pattern diagram for the proper measuring of trail widths. A tracking book with trail width data is a good investment. Here are some trail widths of the commonly confused species to get you well on your way.
Diagonal Walkers:
Bobcat 7-10 cm | Red fox 10 cm | Coyote 12.5 cm | Deer 16-20 cm
Bounders:
Least weasel 2.5 cm | Short-tail weasel 5-6 cm | Long-tail weasel 7 cm | Mink 7.5 cm | Marten 10 cm | Fisher 12.5 cm
NOTE: Weasels tend to exhibit a sexual dimorphism, meaning that the males are often quite a bit larger than the females. Hence, when it comes to trail widths, consider that species with similar trail width size could be somewhat confusing. However, you should consider other clues, as well—like preferred habitat and the area you are in.
Gallopers:
Shrew 2.5 cm | Mouse 3 cm | Vole 3.8 cm | Chipmunk 5 cm | Red squirrel 10 cm | Black/Grey squirrel 12.5 cm | Rabbits 12.5 cm and hares roughly 15 cm
Remember that by combining the pattern type and the trail width, you will be able to recognize tracks to the species level. Moreover, these two clues will allow you to identify old tracks where all you can see is a vague outline of the trail. However, we are just getting started!
Useful Tools and Tips
Plaster tracks. This activity is fun for youth as well as adults. The first step is to arm yourself with some plaster of paris – the stuff you fix holes in the drywall with. I place the powdered plaster into a one-litre milk bag. I bring a second milk bag to do the mixing in. There should be enough for one large track or two small ones. Your next task is to head to the nearest mud hole or pond to scan the edges for tracks. When you find that perfect track (scarcer than one might think), set up a little fence around it so the plaster does not flow away. I usually find four little sticks that frame the outside edges of the track and fill in the remaining cracks with mud. Allow the plaster to form a thick base to hold your track. The next step is to mix the plaster. I pour some plaster into the spare bag and add water. You want a fairly thick consistency because it will dry faster. A watery mixture will take a long time to set. I shake the bag and manipulate it with my fingers on the outside until it is well mixed. Pour the plaster into the track and wait. The preferred method of pulling the plastered track out of the ground is by digging around it with a stick to pry it up from underneath. Otherwise it may break.
Journaling is another way to greatly improve your tracking eye. Of course many naturalists keep track of weather and other interesting data in their journals. One great activity for the journal is to find a place outside where you make a track in the soil. Draw this track in your journal. Return six hours later and make a fresh track, but draw only the older track again. Return a day later and make another track and draw only the oldest track. Keep this process going and you will see how tracks deteriorate over time. One should try this activity in a variety of soil conditions.
Another good activity is to find an animal track and draw every little detail you see. Then, when you think you have every detail drawn, look at the track through a magnifying glass to find more. If you spend 35 minutes doing this, the next time you see a track you will see as much in only 15 minutes. Repeat this process numerous times and you will begin to see things at a glance. Now you’re getting somewhere! It gets to the point where others will think that you’re pulling their leg when relaying the detailed meaning you are pulling out of a track that they can hardly see.
Sandboxes can help you learn what an individual track has to tell you. They will also help you learn of gait or pattern changes that occur with changing speeds. My sandbox is 4 metres by 1 metre and 30 cm deep. There are no toys allowed in this sandbox, and I keep it covered to stop the growth of plants. You will be amazed at what someone can learn in a short period of time just by playing in a sandbox. Basically I have people walk through the box and have them note how the sand reacts to regular paced walking. Then, accelerations and decelerations are added. Next, slight turns are incorporated. Lastly, carrying a weight in one hand is done to see if students can see how the ground responds. In other classes I have walked, jogged and ran with my dog through the tracking box to demonstrate how diagonal walkers’ gaits change with speeds. The dog is happy to do this small service for us, especially when high quality treats are offered after each run. After some study in the sandbox I have the students not watch the tracks as they are being made. I erase all but one track, forcing the students to identify speed, accelerations, turning motions and whatnot from just one track. Believe it or not, many can tell if I have turned my head (an exaggerated head turn) while walking along. Of course, the sandbox creates perfect conditions for this. However, I am usually able to trick my tracking students (the first time) when I walk backwards through the sandbox. They know that the sand is not being kicked up the same way, but they just can’t figure out why.
- TIP 1: Have a rake and shovel handy to smooth over sand after each pass.
- TIP 2: Pay special attention to how debris (sand) is kicked up and sprayed in the direction travelled.
Dominance. Would you believe that some animals’ dominant side can be found at a glance by their tracks? The most obvious are snowshoe hare tracks. Look at the hare track pattern diagram. The hare is moving from the bottom of the diagram towards the top. The smaller front feet land first and the larger rear feet pass around the front and land ahead. Now, also see that the two front feet are not beside each other; rather, they are offset with the right one landing first. Why is the right front foot consistently landing first? How do we know it is landing first? To answer the latter question, we know it is landing first because it registers on the ground before the left front foot. That is, as the animal is moving forward with gravity pulling it to the ground; the right front foot absorbs the initial weight, followed by the left, which comes down after the right. As for the former question of dominance, try this yourself: stand a little distance from a wall and fall forward towards the wall. Notice which arm carries the brunt of the weight or lands first. Try further distances from the wall until you notice which arm works more.
Some 90 per cent of mammals (people included) are right dominant. In the case of a fall, we will likely rely on our dominant strong limb to catch us. The same happens with the gallopers or other animals when their speed or gait increases to a gallop. The right front foot lands first. This will not happen with every track, but it will with most. On occasion you will see animals with left dominant tendencies. The study of dominance goes much deeper than simply observing track patterns. Dominance will offer clues to which way an animal will circle or turn (outside of specific agendas it may have). Ever wonder why lost people wander around in a circle? Do you know which direction they tend to circle in?
Cheat Cards. This is a great way to remember specifics about various animals. I recommend making or buying a set of 3 x 5” cards to write interesting features of every animal species of your area. Of course if you include insects and birds you will be at this for a while. The information you should include is up to you. I would scan three to five books and take what I deemed important from each. I would include the obvious: diet, habitat, range, offspring, predators, behaviours, size and weight, trail width, foot measurements, stride length and common track or gait pattern used.
These cards should fit neatly into your shirt pocket so you can pull them out in the field until you have them memorized.
Tracking Kit. A novice should bring a decent tracking kit into the field. This is your in-field resource to help you solve the many mysteries that await you. Some people go a little overboard with these kits. The kit bag may be a small, generic camera bag with an extra pocket or two. Inside my kit I used to bring my cheat cards, a small paper pad and pencil, a magnifying glass, a small measuring tape, a flashlight and a vernier calliper. The vernier calliper is really a sophisticated six-inch ruler. However, these callipers are able to measure track widths and foot measurements with great ease and speed. You can pick up a plastic one a Canadian tire for under $15. The flashlight is often used to look into small holes in the ground, trees and under rocks. The expanded kit could include plaster of paris for casting tracks and bags and tape for collecting samples of twigs, animal hair or worse. Have you ever heard of scat necklaces? The advanced kit may also contain a camera and binoculars.
I appreciate travelling light and have abandoned the need for any of the afore-mentioned gear. That said, I also have over 10,000 slides of animal tracks and signs, plaster tracks, twigs, sticks, eggs, snake skins, feathers, shells, skulls, scat and much more at home already. If I come across a unique, intriguing trail I will simply go back home and get the camera, magnifying glass or whatever the situation calls for.
Mystery Tracks. If one thing is certain about tracking, it is the certainty of finding mystery tracks. This is one of the many things that make tracking fun, challenging and memorable.
One of my favourite mystery tracks is that of the wind blown leaf. I often take advantage of this common track with my students. As a dead and dry leaf rolls along the snow it creates an interesting pattern similar to that of a mouse. The faint tracks create their own pattern and then stop (as the leaf gets airborne) only to start again one metre later (after the leaf falls back to the ground). I will ask students to identify the pattern, measure the trail width and to try and understand how it left no trace for such a distance. You can probably imagine the responses. Sometimes the leaf will still be at the end of the trail for student to see. To this day I smile when I walk past this type of mystery track.
During one of my own tracking adventures, I stumbled upon some bird tracks. Like all tracks, these were somewhat unique in that the front two of three toes on both feet were close together, leaving the third toe somewhat separate. Like a good novice, I took out my tracking kit, sketched these tracks and noted what seeds it was eating. A little while later I learned that crows have feet that could have made those tracks. Mystery solved! A short while after that I found that jays have similar feet. These tracks still remain a mystery because I did not note the size of the tracks, which would quickly eliminate one or the other bird.
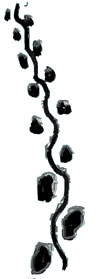
Check out the diagram of the mole track. Review the stats and guess the species that made it. I came across this track at Kekabecca Falls in northern Ontario. I was tickled to see the tracks for their symmetry and oddness. I followed the tracks to a hole in the snow. A few nearby trails showed the same pattern. I knew from past experiences with tracks that it was not a mouse, vole, shrew, small weasel, chipmunk or squirrel. I took a few photos and measured the track width. I also noted the rather large foot prints. These were as large as red squirrels’ feet, but the trail width and depth at which the tracks sank into the fresh snow suggested something the weight of a large mouse. The next Monday I was off to Lakehead University’s Biology department to chat with my mammalogy instructor. I showed him the photos and gave him the details to which he offered some insights. I later read that this certain species stores 60 per cent of its winter fat in its tail. Ah-ha! A big fat tail would leave a mark like the one I remember seeing that day in the mystery track. I then revisited the photos I took and quickly had an answer for the large foot sizes that led me to realize why the trail seemed to zigzag the way it did.
This animal does not find itself above ground very often, hence, my not seeing its tracks before and only a few times since in the snow. Because it lives underground, it has very large paddle-like front feet used for digging tunnels in the earth. These oddly shaped front feet do not allow it to walk very efficiently and make the animal wiggle back and forth as it moves. In case you have not guessed it already, the answer is the star-nosed mole. It is a beautiful little creature that creates little mole hills and tunnels in the grasses and soil. These signs are particularly evident in the early spring right after the snow melts. The tunnels are all over the place and little caverns may be found with hollowed areas inside – likely for resting. Its fur is unique in that it can travel in its tunnels forwards or backwards. In other words, when fur is stroked backwards, it does not stand up, like other animals’ would.
Favourite tracking books
If you decide to take up tracking as a hobby, you may find yourself tracking books at night to figure out what you have seen during the day. One day, while snowshoeing in the hills, I came across a most peculiar find: a bird’s nest with a roof added on. The nest itself was made of sticks and twigs but the roof material was made of mud and leaves. It appeared to be quite sound and likely waterproof. Could a bird have done this? I had never seen such a bird’s nest. I took a few photos and noticed some mouse tracks by the base of the small tree that the nest rested on. Mouse tracks around the base of trees is nothing unusual, as mice often use the hole in the snow made by the base of a small tree as an entry into the subterranean layers, under the snow. Once I returned home, I hit the books. To my exhilaration, I found that mice sometimes renovate old bird’s nests by adding a roof to use as a den. Another mystery solved!
Below is a list of books that I have found to be the best to date. Be sure to read the author’s biography before purchasing a book. Sometimes, generic books offer false information.
- Brown, T. (1983). Tom Brown’s field guide to nature observation and tracking.
An inspiring read. Good tracking tips and philosophy about the nature experience. - Kura, A. (1995). Mammals of the Great Lakes region.
Great general information book about mammals, including skull keys, dental formulas and other good descriptions. I used this book in a fourth-year mammalogy course –it is very expensive and usually needs to be ordered. However, in my opinion, this book is worth the cost for the inquisitive tracker who wants lots of information about local species from one source. - Stokes, D. & Stokes, L. (1986). A guide to animal tracking and behaviour.
A great book for tracks and sign. - Rezendes, P. (1992). Tracking and the art of seeing.
Neat photos of sign, scat and animals, as well as winter shots. - Murie, O.J. (1954). A field guide to animal tracks – the Peterson field guide series.
The classic tracking book. Good information on animal tracks and patterns.
Other Tips
- Consider tracking when the sun is low and casting long shadows. This will make the track depressions dark and scuff marks light up.
- Reach down and the feel the tracks with your thumb or index and middle fingers. You will attain much more information through your fingers than from just looking at a track. For instance, if you cannot see how many toes there are in the track, you may well be able to feel how many there are.
- If a track is covered with snow, simply dig down to the original track and feel for it. It will be firm from the compression of the snow when it was made. It may actually be like a chunk of ice—preserving the original track.
In closing, once you begin tracking you soon discover there is a whole new world out there with many riddles and scenarios waiting to be revealed. Allow yourself to be right; that is, play on your hunches or intuition. If you second-guess everything that you find, you may become discouraged or overwhelmed. Go with the little threads of evidence you see and blend these with the larger picture and knowledge you have; then go with it. Chances are, you will be right more often than not.
Author: Chad Clifford
CWF-FCF
Our mission is to conserve and inspire the conservation of Canada’s wildlife and habitats for the use and enjoyment of all.